How to Create a ticket into Freshdesk?
A new ticket can be created in Freshdesk by below different ways:
- An agent can raise a ticket on behalf of the customer when he is contacted by the customer directly with a query/ request. Here, the agent creates the ticket from the Agent portal with the customer’s name as the requester.
- The agents can also raise a ticket for themselves in the helpdesk. Here, the agent creates the ticket from the Agent portal with his name as the requester.
Steps to create a Ticket:
1. Login to the Portal. i.e. https://axonator.freshdesk.com/
2. Click on ‘New ticket‘ icon from the Menu bar on the top next to the ‘Search’ icon.
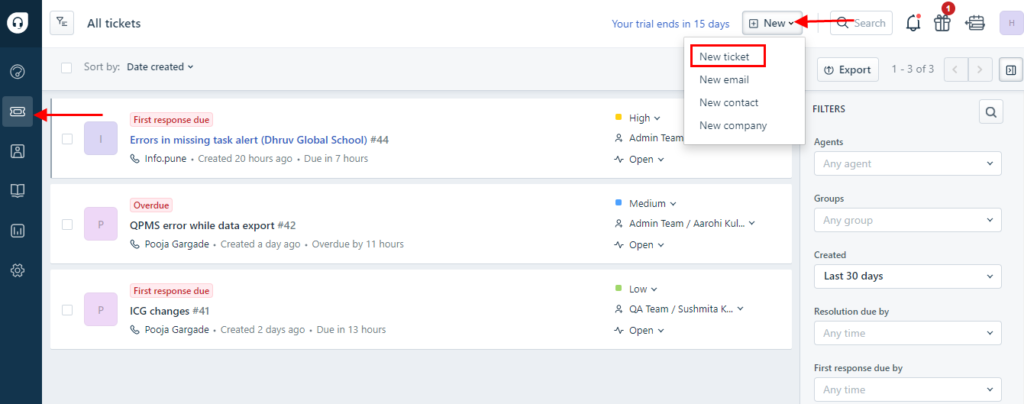
3. The new ticket form will be displayed.
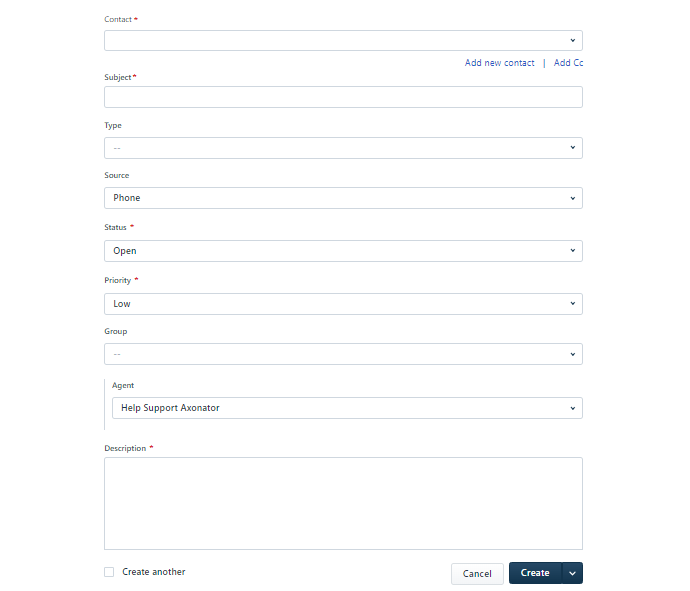
Here,
1. Contact : When you raise a ticket on the behalf of the customer then contact email id will be of Customer’s email id. And when the agent will raise a ticket for themselves then contact email id will be agent’s email id.
2. Subject: Give the issue description in short.
3. Type: Select the type of the issue from dropdown list. Ticket types are as follow:
- Question: When client will ask any doubt or query regarding existing functionality then it will be a Question.
- Incident: is used to indicate that the requester is experiencing a single occurrence of a problem.
- Problem: is used to indicate that the requester is having an issue with your product or service that needs to be resolved and that is affecting multiple users.
- Feature Request: Feature requests are specific ideas that a customer will send to the company asking them to add something that they feel will make the product better.
4. Status: Select the status of the issue/ticket. Status type are as follow:
1. Open: Every new ticket that is created in your helpdesk is marked as Open. It means that an agent is yet to start working on the ticket.
2. Pending on User: Pending on user means some information related to the ticket, such as the device model number, browser version, user ID who faced the issue, datetime, etc., is not yet received from the client or the end user, which is needed to resolve that ticket.
3. In Progress: Means the assigned agent is working on the ticket to resolve the issue or answer the question.
4. On Hold: If the ticket resolution is put on hold for some reason, the status will be set to On Hold with the comment describing the reason behind putting it on hold.
5. Answered: If the ticket type is “Question” and agent has given the answer to it, then status will “Answered”. The way Incident type tickets have “Resolved” status, Likewise, Question type tickets have “Answered” status.
6. Resolved: Means the ticket is resolved by the assigned agent and awaits verification from the client or the end user.
7. Waiting On User: Means the ticket resolution has been communicated with the end user for verification from them. The confirmation from end user that issue is resolved is expected at this stage of the ticket.
8. Closed: When the bugs are fixed and the resolution is also confirmed by the QA as well as the end user, then the ticket will be moved to “Closed”
5. Priority: Select the priority of the ticket from the dropdown list.
6. Group: Select the group to whom you want to assign the ticket.
7. Agent: Select the Agent name of the selected group to whom you want to assign the ticket.
8. Description: Give the detailed description of the ticket/issue.
Click on the Create button. The ticket will be get created and it will get assigned to the selected Agent.

0 Comments